HOLE 1
Par: 4

Stroke Index: 17

Width of green: 

Length of green: 30m

Pro Tip
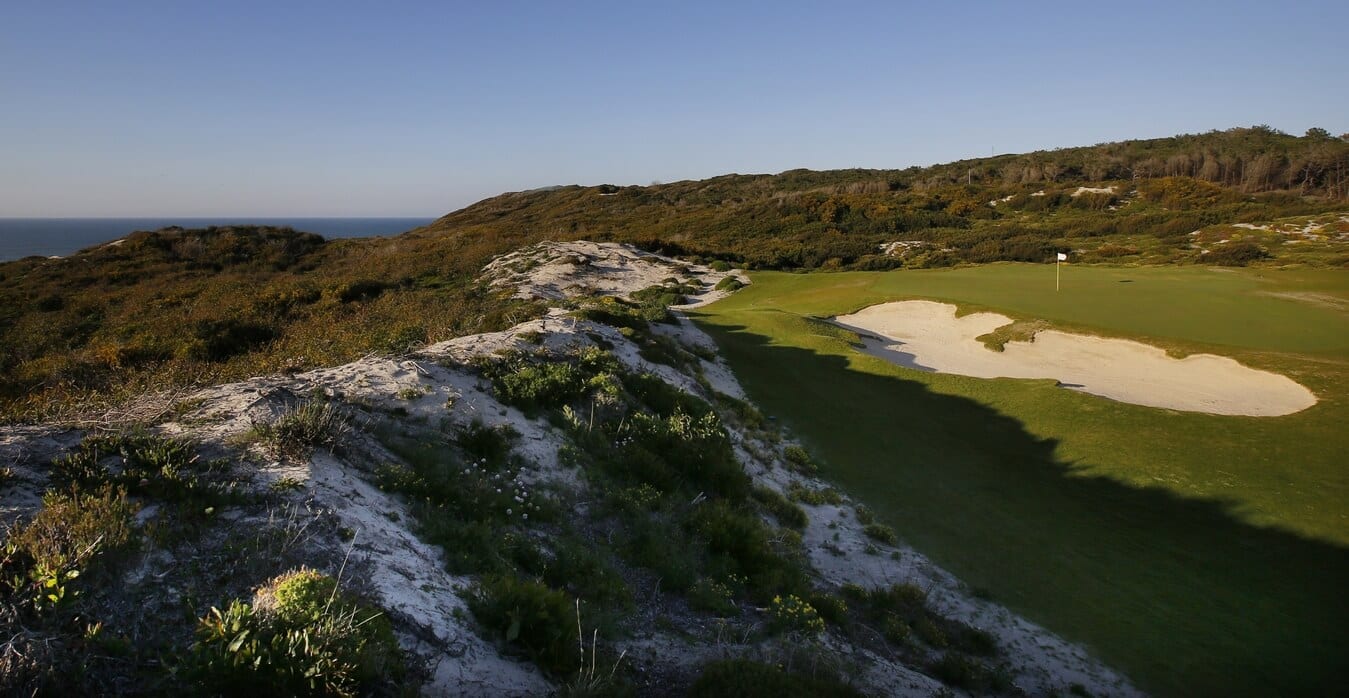
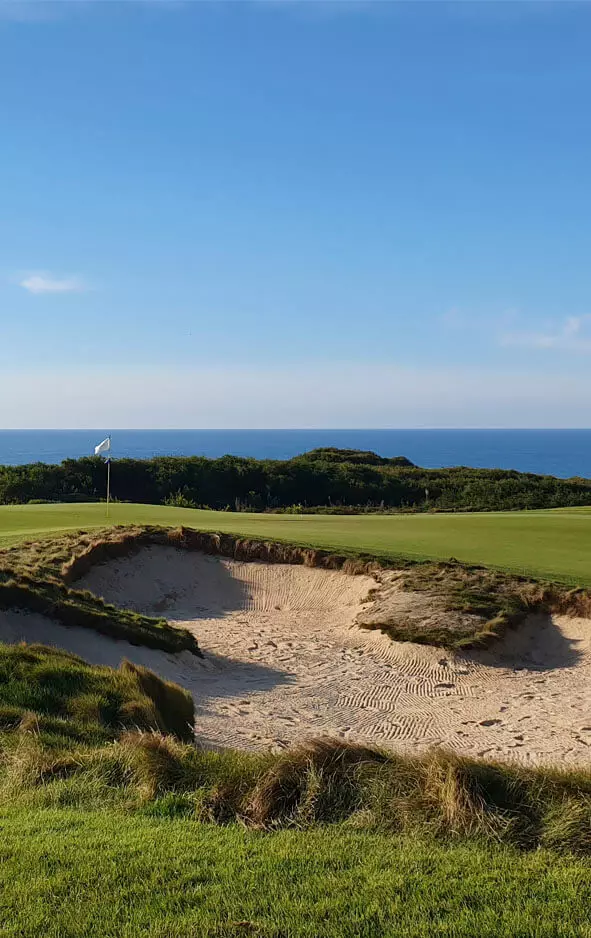
The best position to place your tee shot is on the upper left plateau of this split level fairway with the long left fairway bunker as the target. A second shot from the low right has a limited view of the long, undulating green surface protected on the right by a deep pot bunker. Depending on hole location, the safest play into the green is to the left.
HOLE 2
Par: 3

Stroke Index: 15

Width of green: 

Extensão do green: 35m

Pro Tip
From the elevated tees, players have a good view of the sandy waste area that crosses in front of the green and borders the entire right side. There will be a constant ‘swirl’ influencing the tee shot. The green is large and fair with lows on both the left and right to catch wayward shots.
HOLE 3
Par: 4

Stroke Index: 1

Width of green: 

Length of green: 26m

Pro Tip
Try and place the tee shot down the centre so the left to right slope kicks the ball to the right. Too far left and the large sand dune will block the view of the green. The small green is flanked by water on the right and a large sand dune and bunkers on the left.
HOLE 4
Par: 4

Stroke Index: 5

Width of green: 

Length of green: 31m

Pro Tip
The right and higher side of the fairway is the preferred tee position that offers the best view of the green. The narrow green is shaped on top of several low lying natural mounds. The green is crowned with large collection areas on three sides of the ridge bisecting the putting surface. This will determine the shape of the second shot.
HOLE 5
Par: 3

Stroke Index: 7

Width of green: 

Length of green: 34m

Pro Tip
The long green is a redan style, sloping front to back. There’s more room in front and on the right of the green. The large deep bunkers on the left are to be avoided.
HOLE 6
Par: 5

Stroke Index: 11

Width of green: 

Length of green: 30m

Pro Tip
Place your tee shot in the centre of the fairway, avoiding the right where the large dunes will block your second shot. The second landing area is wide but the best approach to the green is from the centre. For the best access to the green, aim the second shot to the flat open approach slightly left of the bunker guarding the right front.
HOLE 7
Par: 5

Stroke Index: 3

Width of green: 

Length of green: 30m

Pro Tip
The tee shot should be right of centre to avoid the large sand dunes on the left. The second landing area is on the high ground leading to the green between a series of lower valleys. Although the approach is wide, execute the shot carefully avoiding the ‘kicks’ off the green to the left or right.
HOLE 8
Par: 4

Stroke Index: 13

Width of green: 

Length of green: 26m

Pro Tip
This is a strong dog-leg left with the fairway almost perpendicular to the line of flight. Tee shots played to the right will find a receptive fairway but a longer shot into the green. When the prevailing wind is down, long hitters may gain an advantage by taking a line down the left toward the fairway bunker on that side. The green is on the crest of a ridge with a drop off on the right.
HOLE 9
Par: 4

Stroke Index: 9

Width of green: 

Length of green: 27m

Pro Tip
The safe play is to hit your tee shot to the elevated landing area and then hit a lofted club into the wide open green complex. The green falls off hard right to left so it is best to keep your ball below the pin.
HOLE 10
Par: 4

Stroke Index: 10

Width of green: 

Length of green: 34m

Pro Tip
The fairway is generous at the landing area but the drive is partially blinded by a native sand dune that players must carry from the tee. Place your tee shot right of centre avoiding the deep hollow on the left. This short hole is surrounded by native coastal vegetation so there is a premium on club selection to make sure the ball finds green grass.
HOLE 11
Par: 4

Stroke Index: 14

Width of green: 

Length of green: 33m

Pro Tip
A tee shot aimed at the broad bunker on the fairway’s left side will allow a clear sight to the green. Tee shots drawing too far left will be blinded by a massive sand dune. The green is large with a wide opening but demands a tight approach to minimize the many subtle contours that can make scoring more difficult.
HOLE 12
Par: 3

Stroke Index: 18

Width of green: 

Length of green: 32m

Pro Tip
Avoid the menacing native sandy waste bunker on the right. An errant shot finding the large bail-out on the left allows a straight forward chip shot. The long bunker left of the green is not as close to the green as it appears, offering a suitable target for executing a fade to the pin. This green also has some deceiving contours so accuracy will be rewarded.
HOLE 13
Par: 5

Stroke Index: 8

Width of green: 

Length of green: 33m

Pro Tip
The tee shot should be aimed down the centre using the backdrop of the natural dune bunker as the target. For the best chance to score, play the second shot on a line towards the right greenside bunker. The large steep slopes on the right are to be avoided. There’s plenty of room for recovery from behind this green to tempt players into going for the green in two.
HOLE 14
Par: 4

Stroke Index: 2

Width of green: 

Length of green: 33m

Pro Tip
Direct your tee shot to the higher right-hand side and the ball should roll back to the centre. On the lower left the player may find the waste bunker or a partially blind shot into the green. A native sandy dune divides the fairway and the approach to the green. The green falls off right to left so use the slopes to feed the ball towards the pin.
HOLE 15
Par: 5

Stroke Index: 16

Width of green: 

Length of green: 35m

Pro Tip
Players should swing away and use the slope on the left to advance their tee shot and bring it back to the centre. The second landing area has two levels. With the green perched high in a sand dune, it is best approached from the higher level on the left. The large green shaped into the right side of the dune, with bunkers both right and left, makes this a challenging birdie.
HOLE 16
Par: 3

Stroke Index: 12

Width of green: 

Length of green: 33m

Pro Tip
Players on the back tees will thread their tee shot between the dune on the right and the pine forest on the left. The large bail-out area on the right offers players a chance to chip on and save par. Shots finding the native bunkers below the green’s left side, will challenge the best players.
BURACO 17
Par: 4

Índice do buraco: 6

Largura do green: 

Extensão do green: 32m

Pro Tip
No shot de saída o voo de bola tem de ultrapassar um vale amplo e profundo que faz com que o fairway elevado pareça mais distante. Para conseguir uma boa colocação para o segundo shot, deve evitar-se a enorme duna do lado direito do fairway. Caso opte por uma estratégia mais arriscada, poderá direccionar o seu primeiro shot ligeiramente à esquerda da duna, e aproveitar a inclinação natural do fairway para colocar a sua bola mais perto do green. O green fica do lado direito do fairway, no fim da colina, rodeado por pinheiros.
HOLE 18
Par: 4

Stroke Index: 4

Width of green: 

Length of green: 28m

Pro Tip
From the variety of elevated tees, players are offered several avenues of play to a green guarded by a large lake. If players elect to play to the right side of the fairway, directly at the lake, they are left with a short iron across the lake to the narrow green. Playing to the left leaves a longer but more direct shot into the green. This hole will provide an exciting finish.
HOLE 17
Par: 4

Stroke Index: 6

Width of green: 

Length of green: 32m

Pro Tip
The tee shot must carry a deep valley which makes the elevated fairway appear far away. There’s a sand dune on the right that must be avoided to have a clear second shot into the green, which is nestled in the pine forest at the bottom of the hill. Players can challenge this hole by finding the ‘speed slot’ just left of the dune.

What is Your Contact
Related to?

Do you want to contact us directly by phone? Feel free to call us between 9:30AM and 6:30PM GMT, at the number + 351 262 249 880.

SUBSCRIBE TO OUR NEWSLETTER
BURACO 16
Par: 3

Índice do buraco: 12

Largura do green: 

Extensão do green: 33m

Pro Tip
O shot de saída dos tees das brancas terá de encontrar o seu caminho entre a duna à direita e o pinhal à esquerda. Do lado direito do green encontrará mais chances de recuperar um shot falhado e salvar o par. Ao colocar a bola à esquerda do green poderá encontrar alguns bunkers que irão certamente desafiar os jogadores mais experientes.
BURACO 18
Par: 4

Índice do buraco: 4

Largura do green: 

Extensão do green: 28m

Pro Tip
Um conjunto de tees com diferentes elevações, oferece aos jogadores diferentes linhas de saída para o primeiro shot. O green está protegido por um grande lago. Os jogadores que optem por jogar para o lado direito do fairway, ficam com um segundo shot mais curto com o obstáculo de água pela frente. Os jogadores que optem por jogar para o lado esquerdo do fairway, ficam com um segundo shot mais longo mas mais directo para o green. De qualquer forma, sem dúvida que este buraco oferece um fim de volta desafiante!
BURACO 15
Par: 5

Índice do buraco: 16

Largura do green: 

Extensão do green: 35m

Pro Tip
No shot de saída aproveite a inclinação da esquerda do fairway para fazer com que a sua bola role e se mantenha ao centro. A zona de colocação do segundo shot dispões de dois níveis. Uma vez que o green é elevado, a zona de fairway mais alta do lado esquerdo é a que permite ter o melhor de aproximação ao green. O green, moldado do lado direito da duna, é rodeado por bunkers do lado direito e esquerdo, tornando o birdie um verdadeiro desafio.
BURACO 14
Par: 4

Índice do buraco: 2

Largura do green: 

Extensão do green: 33m

Pro Tip
Direcione o seu shot de saída para o lado direito do fairway, uma vez que a sua inclinação natural deverá fazer a bola rolar para o centro. O lado esquerdo do fairway é o menos seguro para a colocação da sua bola uma vez que poderá alcançar o waste bunker, ou ficar com pouca visibilidade para o green. Uma duna com vegetação natural divide o fairway e dificulta a aproximação ao green. O green tem uma inclinação natural da direita para a esquerda que pode aproveitar a seu favor para colocar a bola perto da bandeira.
BURACO 13
Par: 5

Índice do buraco: 8

Largura do green: 

Extensão do green: 33m

Pro Tip
O shot de saída deve ser colocado ao centro do fairway, e poderá considerar o enorme bunker natural de dunas como alvo. Para aumentar a probabilidade de um bom resultado, o segundo shot deverá ser jogado na direcção do bunker do lado direito do green, mas deverá evitar que a bola chegue às encostas íngremes situadas mais à direita. Atrás do green existe um amplo espaço que permite uma fácil recuperação aos jogadores que estrategicamente optem por tentar alcançar o green em duas pancadas.
BURACO 12
Par: 3

Índice do buraco: 18

Largura do green: 

Extensão do green: 32m

Pro Tip
No shot de saída deverá evitar o waste bunker à direita. Um shot colocado à esquerda do green permite um shot de aproximação mais simples. O bunker à esquerda do buraco não está tão perto do green quanto parece, e pode ser considerado uma boa linha de jogo para um shot em fade. As ondulações do green são enganadoras pelo que a precisão nos putts será recompensada.
BURACO 11
Par: 4

Índice do buraco: 14

Largura do green: 

Extensão do green: 33m

Pro Tip
Um shot de saída apontado ao grande bunker do lado esquerdo permitirá uma boa visibilidade para o green. Se o shot for demasiado à esquerda a visibilidade será condicionada por uma enorme duna. O green é amplo, mas exige uma abordagem precisa para minimizar a probabilidade de ficar com um putt que tem de enfrentar as várias ondulações da sua superfície.
BURACO 10
Par: 4

Índice do buraco: 10

Largura do green: 

Extensão do green: 34m

Pro Tip
O tee de saída não tem muita visibilidade para o amplo fairway deste buraco e o voo de bola tem de ultrapassar inicialmente uma zona de dunas. Coloque a sua bola ligeiramente à direita do centro do fairway evitando a zona mais baixa do lado esquerdo. O buraco é bastante curto mas rodeado de vegetação natural, o que faz com que seja essencial escolher bem o seu taco para manter a bola na relva.
BURACO 9
Par: 4

Índice do buraco: 9

Largura do green: 

Extensão do green: 27m

Pro Tip
A zona mais segura para colocar a sua bola com o shot de saída é no patamar mais elevado do fairway, e de seguida optar por um shot alto para evitar os obstáculos. O green tem uma forte inclinação da direita para a esquerda, e será melhor manter a sua bola antes da bandeira.
BURACO 8
Par: 4

Índice do buraco: 13

Largura do green: 

Extensão do green: 26m

Pro Tip
Este buraco apresenta uma curva acentuada à esquerda, sendo que o fairway é quase perpendicular à linha do shot de saída. O lado direito do fairway é seguro mas ficará com um longo shot para o green. Em dias de vento favorável, os jogadores com distância poderão arriscar jogar em direcção ao bunker de fairway mais à esquerda. O green está localizado no topo de uma elevação com uma inclinação acentuada do lado direito.
BURACO 7
Par: 5

Índice do buraco: 3

Largura do green: 

Extensão do green: 30m

Pro Tip
De forma a evitar as grandes dunas de areia à esquerda, colocar o shot de saída ligeiramente à direita do centro do fairway. A segunda área de colocação é numa zona de fairway mais elevada, entre uma série de pequenos vales. O shot ao green tem muita amplitude, mas deverá ser cauteloso, evitando que a bola role para fora do green que à esquerda, quer à direita.
BURACO 6
Par: 5

Índice do buraco: 11

Largura do green: 

Extensão do green: 30m

Pro Tip
Coloque o seu shot de saída no centro do fairway, e evite o lado direito onde as dunas bloquearão o seu segundo shot. Embora a área de colocação do segundo shot seja ampla, considere que o melhor posicionamento para o shot ao green é do centro do fairway. No terceiro shot apontar ligeiramente à esquerda do bunker que protege o green à direita, para conseguir a colocação da bola na zona mais plana e segura do green.
BURACO 5
Par: 3

Índice do buraco: 7

Largura do green: 

Extensão do green: 34m

Pro Tip
O green é estilo redan, com inclinação da frente para o fundo. Há mais espaço para colocação de bola à frente e à direita do green. Os bunkers grandes e profundos da esquerda devem ser evitados.
BURACO 4
Par: 4

Índice do buraco: 5

Largura do green: 

Extensão do green: 31m

Pro Tip
A melhor colocação de bola para o shot de saída é do lado direito do fairway que é mais alto e garante melhor visibilidade para o green. Este par 4 tem um green estreito, com ondulações subtis e naturais do terreno. O green é caracterizado por três áreas de recepção de bola, divididas pelos desníveis da sua superfície, condicionando a abordagem ao segundo shot.
BURACO 3
Par: 4

Índice do buraco: 1

Largura do green: 

Extensão do green: 26m

Pro Tip
O local ideal para o shot de saída é no centro do fairway uma vez que a inclinação do terreno da esquerda para a direita deverá colocar a bola bem posicionada para o segundo shot. Se ficar demasiado à esquerda, a visibilidade para o green será condicionada por uma grande duna de areia. O green é pequeno, com água à direita, e por dunas e bunkers à esquerda.
BURACO 2
Par: 3

Índice do buraco: 15

Largura do green: 

Extensão do green: 35m

Pro Tip
Dos tees de saída elevados os jogadores têm uma boa visão sobre a zona de areia que atravessa o campo em frente ao green e o ladeia pelo lado direito. O shot de saída é geralmente afectado pelo vento. O green é generoso com zonas mais baixas tanto à esquerda como à direita, de modo a captar shots menos certeiros.

BURACO 1
Par: 4

Índice do buraco: 17

Largura do green: 

Extensão do green: 30m

Pro Tip
A melhor posição para colocar a bola com o seu shot de saída é no plateau superior à esquerda do fairway, considerando o longo bunker do lado esquerdo como alvo. Caso a sua bola fique colocada do lado direito do fairway, terá uma visão limitada do green longo e ligeiramente ondulado, protegido por um bunker profundo à direita. Independentemente da posição da bandeira, a aproximação ao green é mais segura é pelo lado esquerdo.